The Scotch-Yoke Kinematic-Chain
A Scotch-Yoke is a mechanism that changes rotary motion at its input to linear motion at its output.
The kinematic-chain is:
1.One Motion-Part – a Rocker / Crank
2.One dyad – an R-P-P dyad.
Closure - Review the Change Dyad Closure tool - you may need to use it after the dyad builds the first time).
Note: When the crank has constant angular velocity, the motion of output Slider is Simple Harmonic Motion
However, there are two Motion-Laws in MotionDesigner that can modulate* the rotation of the Crank in a useful way.
The Y-Inverse-Sinusoid and the Crank-Constant-Velocity modulate the Crank rotation so that the Slider moves with a Constant Linear Velocity for a period of its rotation.
* Modulate is to change the speed of the Crank as it rotates.
|
|
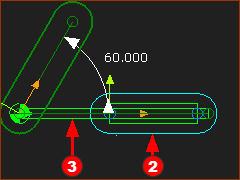
The video is of a Scotch-Yoke.
STEP 1: Add the Input – a Crank
1.Edit the Base-Part
2.Part-Editor: : Drag to add the Line , , , Close the Part-Editor:
3.Mechanism-Editor: Click : drag to add the new Part.
4.Mechanism-Editor: Click : Click the start-Point of the new Part and the start-Point of the Line in the Base-Part.
5.Mechanism-Editor: Click Click the Pin-Joint the Line in Base-Part; the CAD-Line in Part.
6.Click in Command-Manager
7.Mechanism-Editor: Click : and click the graphics-area. Joint the FBs with a wire. You have a Crank |
|

|

|
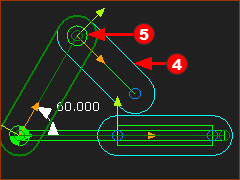
STEP 2: Add R-P-P DYAD
We must add 2 Parts - we will name the Parts as Part-A and Part-B
We must also add 3 Joints - we will name the Joints as Joint-A, Joint-B, and Joint-C
|
DYAD: Part-B & Joint-C
The output of the Scotch-Yoke is a Sliding-Part
1. Mechanism-Editor: Click : Drag to add the Part (Part-B)
2.Mechanism-Editor: Click : Add the Slide-Joint: (Joint-C) Click the CAD-Line in Part (Part-B) and the horizontal Line in the Base-Part |
|

|
DYAD: Part-A & Joint-A
1.Mechanism-Editor: Click : Drag to add the new Part (Part-A)
2.Mechanism-Editor: Click : Add the Pin-Joint: (Joint-A) : Click the start-Point of the new Part and the end-Point of the Crank |
The two Parts are not solved.
We must add one more joint.
|

|
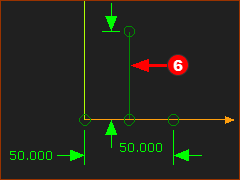
Prepare to add Slide-Joint (Joint-B)
Add a vertical line to give the direction of the Slide-Joint
1.Part-Editor: Edit Part (Part-B)
2.Part-Editor: , ,
3.Close the Part-Editor |
This image has the vertical Line in the Part-Editor.
|

|
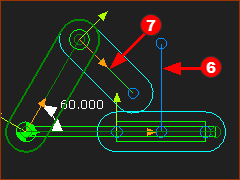
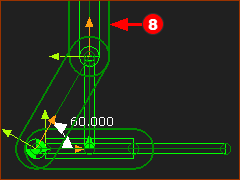
Add Joint 3: the Slide-Joint (Joint-B)
This image has the vertical Line in the Mechanism-Editor.
1.Mechanism-Editor: Click :
a.Click the vertical Line in Part (Part-B)
b.Click the Cad-Line in Part (Part-A)
MechDesigner completes the dyad to add the Slide-Joint (Joint-B)
|
The Parts are now kinematically-defined.
Note:
Part along the Slide-Joint is either upwards or downwards. This does not change the kinematics.
If you want the Part in the other direction: Add Line (see image above), by dragging it in the opposite direction, from top to bottom, or vice versa.
|
Cycle the mechanism
Press the ALT+C key combination on your keyboard
|

|

|
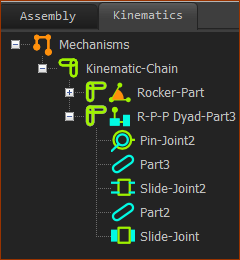
These are the element in the kinematics-tree for a Scotch-Yoke.
There is a:
•Rocker (the kinematic term we use for a Crank)
•R-P-P dyad: one Pin-Joint and two Slide-Joints. |
|
URL of this topic:
http://mechdesigner.support/index.htm?md-scotch-yoke-mechanism.htm