Indexing Motion
This tutorial designs an indexing motion.
After this tutorial you should be able to:
•delete segments
•make sure the Motion-Width is 360º - and what to do if it is not 360º
•change the motion-law of a segment
•edit the X-axis value of a Blend-Point
•edit the Y-axis position value of a Blend-Point
Terminology
Indexing Terminology
Term : |
Definition |
|---|---|
Indexer : |
A device whose input is a constant-speed (usually) Cam-Shaft and output is a rotating-Part with a progressive motion (usually). When the input rotates one time, the output indexes by the Index-Angle one (most usually), two, or sometimes three times. The complete indexing motion usually has two segments: the Index-Segment and the Dwell-Segment. |
Index-Segment : |
The motion-segment that moves the follower (output-shaft). There is usually one index-segment. |
Index-Period : |
The angle the Input-shaft rotates while the output-shaft indexes. |
Index-Angle : |
The angle the output-shaft rotates in one index. 360 / Index-angle = number-of-stops. (an Integer) |
Dwell-Segment : |
The motion-segment in which the output-shaft does not move. There is usually one dwell-segment in a motion. |
Dwell-Period : |
The angle the input-shaft rotates while the output-shaft is in its dwell-segment. Dwell-Period = 360 – Index-Period |
Number-of-Stops : |
The number of times the output-shaft must index to complete one rotation of exactly 360º. “Number of Steps = 360º / Index-Angle” |
Indexer-Type : |
The number of index-segments in one rotation of the input-shaft (Cam-Shaft). |
Video : Motion Tutorial 1: Design an Indexing Motion

Motion Tutorial 1: Design an Indexing Motion
 Default Motion: Four Flexible-Polynomial Segment |
Default Motion: Number-of-Segments = 4 X-axis units = degrees. Motion-Width = 360º Motion-Laws = Flexible-Polynomial |
|
To change the Y-axis units to “degrees”: 1.Click the Edit toolbar > Active Motion-Settings |
 |
|
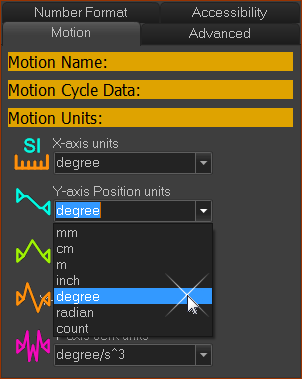
2.Click the drop-down arrow for Motion tab > Motion Units separator : Y-axis - Position 3.Select degree in the drop-down box. Position, Velocity, Acceleration, and Jerk units are now also based on degrees. |
|

Index motions usually have 2 segments. Thus, we must delete two segments from the default motion. Before we can delete a segment, we must make it the Selected-Segment. 1.Click in the motion-graph area above or below the last segment at the end of the motion The last segment is now the Selected-Segment. |
|
 |
|
 Delete Selected-Segment |
|
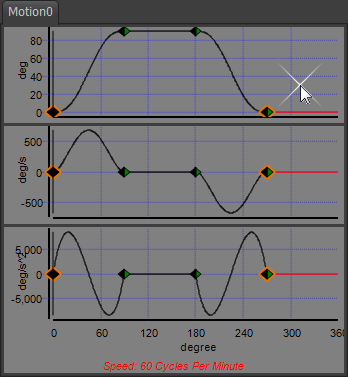
To delete the Selected-Segment 2.Click the Blend-Point & Segment Editor toolbar > Delete Segment See toolbar above: •The Segment-Width of the last segment increases by the Segment-Width of the segment you have deleted. •The total Motion-Width does not change; it is 360º. •The first segment becomes the Selected-Segment. You need to delete the last segment again. 3.Do again 1 and 2. Now there are two segments - see image below. X-axis values: •Segment 1: Index-Period = 0 - 90º - Segment-Width = 90º •Segment 2: Dwell-Period = 90 - 360º - Segment-Width = 270º The Motion-Width = 360º Y-axis values: •Segment 1: Index-Angle = 0 - 90º •Segment 1: Dwell Angle = 90º |
|
 |
|
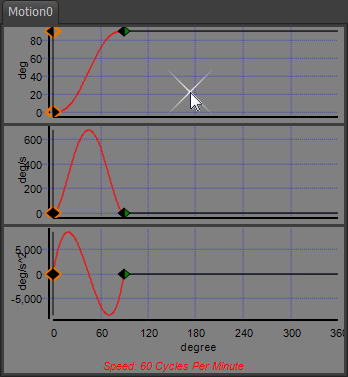
Edit the Index-Period and the Index Angle of the Indexing Motion to: X-axis values: •Segment 1: Index-Period = from 0 - 90º to 0 - 120º •Segment 2: Dwell-Period = 120 - 360º The Motion-Width = 360º Y-axis values : •Segment 1: Index-Angle = from 0 - 90 to 0 - 120º •Segment 1: Dwell Angle = 120º |
|
 |
|
To edit the Segment-Width of a segment •Use the Blend-Point Editor to move Blend-Point 2 or •Use the Segment-Editor to make the first segment longer and then make the last segment shorter. Note:
STEP 1.Open the Blend-Point Editor a)Click: Blend-Point and Segment toolbar > Open Blend-Point Editor |
|
 Blend-Point Editor button |
|
 |
|
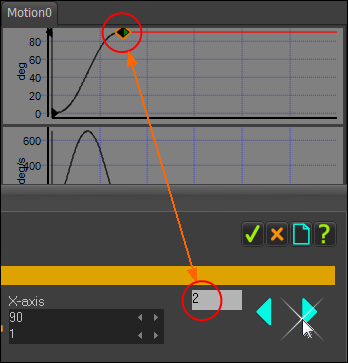
STEP 2.Make sure the active Blend-Point is #2 1.Use the Previous / Next buttons to move the active Blend-Point to #2 You can see the X-axis value is 90º Reminder: The Blend-Point Editor edits the active Blend-Point. The active Blend-Point is at the start of the Selected-Segment. |
|
 |
|
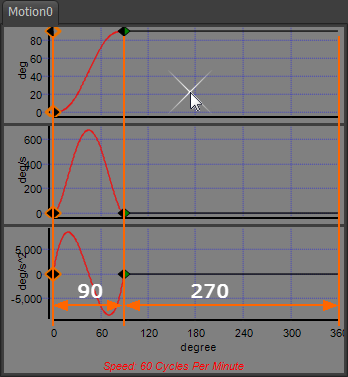
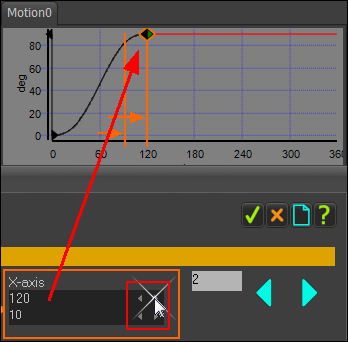
STEP 3.Edit the X-axis value You can enter a new value or use the spin-box tool to edit the X-axis value of the Blend-Point. 1.Click the bottom arrow-buttons in the spin-box tool to make the Spin-Increment = 10. 2.Click the top arrow-buttons in the spin-box tool to increase X-axis value from 90º to 120º. Or: 1.Use your keyboard to enter a value in the X-axis data-box (enter 120) 2.Press the Enter key on your keyboard to update to the new value (120) When you edit the X-axis value of the active Blend-Point, the duration (period) of the Previous-Segment and the Selected-Segment change at the same time. But, importantly, the Motion-Width does not change. |
|
 |
|
 Motion Laws ...  ... continued. |
|
STEP 4.Change the Motion-Law of the last segment (#2) to a Dwell The default motion-law of each segment is Flexible-Polynomial. To change the Motion-Law of a segment: 1.Click the segment (the last segment in this example) so that it becomes the RED Selected-Segment. 2.Click the down-arrow in the Motion-Law Selector in the Motion toolbar (below the motion graph plots). 3.Click Dwell to change the motion-law from a Flexible-Polynomial to a Dwell motion-law. STEP 5.Change the Motion-Law of the first segment (#1) to a Modified-Sinusoid 1.Click the first segment so that it becomes the RED Selected-Segment 2.Click the down-arrow in the Motion-Law Selector in the Motion toolbar (below the motion plots) 3.Select Modified-Sinusoid to change the motion-law from a Flexible-Polynomial to a Modified-Sinusoid motion-law. IMPORTANT: After you select a motion-law, click in the graph area (not on a segment) to remove the 'focus' from the Motion-Law selector. Otherwise, if you use your scroll mouse button, the segment may scroll through the motion-laws! Not a good result! |
|
 |
|
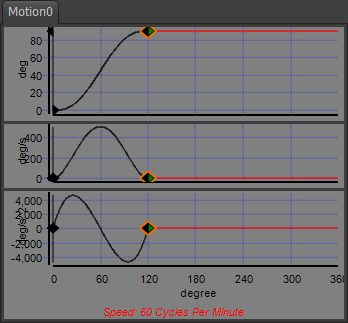
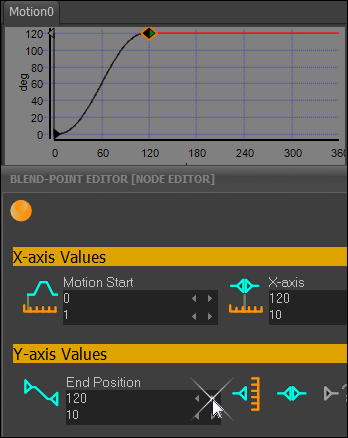
STEP 6.Edit the Index-Angle (Y-axis-Values) If necessary, open the Blend-Point Editor again - see STEP 1 Make sure the Segment #2 is the Selected-Segment - see STEP 2 In the Y-axis values separator, edit the End-Position. We want to increase the End-Position from 90 to 120º 1.Click the spin-box of the End-Position - see image to the above The motion graphs auto-scale. Thus, look at the Y-axis scale of the Position graph (left of motion graph) to see the change to the motion. Question: What if you do not change the Motion-Law of the second segment to a Dwell? Answer: The Position of the active Blend-Point (at the start of the Selected-Segment) increases, but the Position at the end of the Selected-Segment does not change. You will need to edit the End-Position of the last segment. To edit the End-Position of the motion, click the Segment #1. |