Edit Flexible Polynomial Motion-Law - Basic-Level
It is easier to learn how to edit the Flexible Polynomial when all of the segments in the motion are Flexible-Polynomial motion-laws.
Video
Motion Tutorial 2: Edit Flexible Polynomial Motion Law
How to edit the Flexible Polynomial motion-law - Basic Level
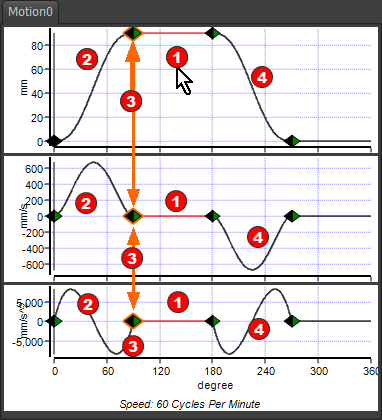
Note: The X-axis is below the bottom graph. All the graphs have the same X-axis values. STEP 1: Make the second segment the Selected-Segment 1.Click above or below (not on*) the graph of the second segment 2.Look at the Motion-Law Selector - the second segment is Flexible-Polynomial * If you click a graph-line, the Segment-Editor opens. We want to use the Blend-Point Editor. Terminology - see image below.
|
 |
 Open Blend-Point Editor icon |
STEP 1.Open the Blend-Point Editor. Click Blend-Point & Segment toolbar > Blend-Point Editor Note: You may need to re-size the Blend-Point Editor when you open it the first time. |
|||||
STEP 2.Edit the X-axis value
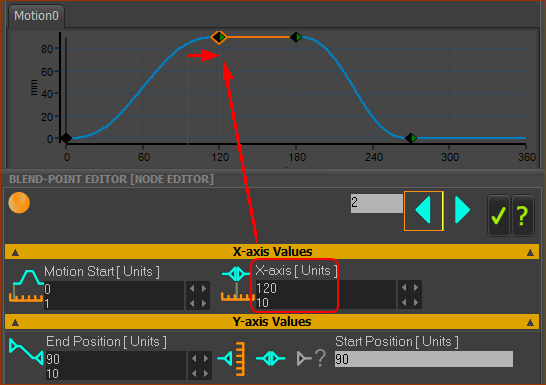
Notes: See image below Segment-Width of the Previous-Segment is 30º more Segment-Width of the Selected-Segment is 30º less Previous Segment-Width + Selected Segment-Width does not change. and the Motion-Width does not change. The red arrow in the image is: •from the X-axis value in the Blend-Point Editor •to the X-axis value of the Active Blend-Point in the motion graph area. |
||||||
 |
||||||
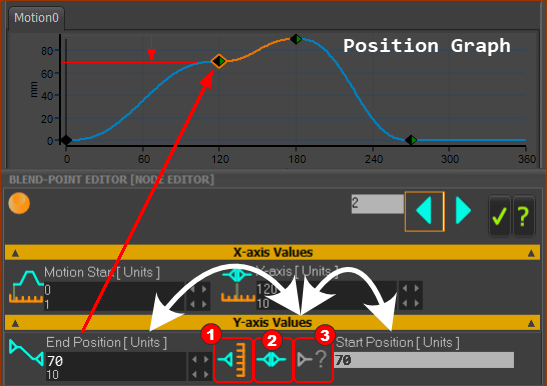
In the Blend-Point Editor - you will see you can edit the End-Position This is the Position value (mm) at the End of Previous-Segment. The Match Control-Button is enable. Therefore, the Start-Position of the Selected-Segment = End Position of the Previous-Segment STEP 1.Edit the Position 1.If necessary, click the Y-axis Values separator to show the data-boxes 2.Use the spin-box (see note below if you do not see the Spin-Box) to decrease the Position value from 90 to 70 OR 2.Enter 70 with your keyboard, and also press the ENTER key on your keyboard Note: If the Spin-Box tool is not to the right-side of any of the motion-value data box, then Double-click in the data-box, maybe two times, until the Spin-Box is to the right od the data-box.. See image below Control Buttons
- we can edit the End-Position at the End the Previous-Segment.
- the Start of the Selected-Segment MUST EQUAL End of the Previous-Segment.
- because the Match Control Button is active, the Start-Position must equal the End-Position |
|
|
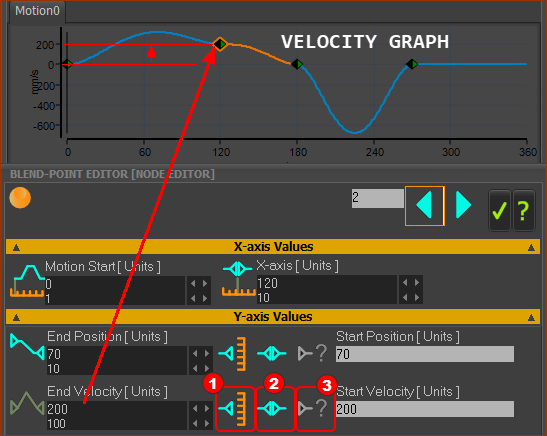
In the Blend-Point Editor - you will see you can edit the End-Velocity This is the Velocity (mm) at the End of Previous-Segment. STEP 1.Edit the Velocity 1.If necessary, click the Y-axis Values separator to show the data-boxes 2.Use the spin-box, to increase the Velocity value from 0 to 200mm/s OR 2.Enter 200 with your keyboard, and also press the ENTER key on your keyboard Note: If the Spin-Box tool is not to the right-side of a motion-value data box, then Double-click in the data-box, maybe two times, until the Spin-Box is to the right of the data-box. Notes: See image below The Velocity Control-Buttons are identical to the Position Control-Buttons
We can edit the Velocity at the End the Previous-Segment.
Start of the Selected-Segment MUST EQUAL End of the Previous-Segment.
The Start-Velocity is Read-Only, because it must equal the End-Velocity. |
 |
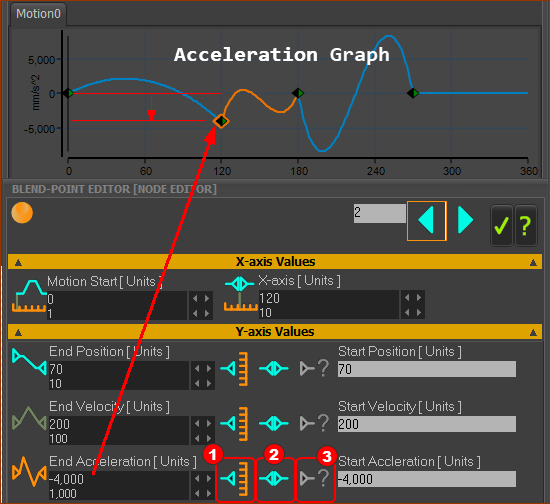
In the Blend-Point Editor - you will see you can edit the End-Acceleration This is the Acceleration (mm) at the End of Previous-Segment. STEP 1.Edit the Acceleration 1.If necessary, click the Y-axis Values separator to show the data-boxes 2.Use the spin-box, to increase the Velocity value from 0 to –4000mm/s ( or enter 200, and press the ENTER key on your keyboard ) Notes: See image below The Acceleration Control-Buttons are identical to the Velocity and Position Control-Buttons
We can edit the Acceleration at the End the Previous-Segment.
Start of the Selected-Segment MUST EQUAL End of the Previous-Segment.
The Start-Acceleration is Read-Only, because it must equal the End-Acceleration. |
 |