Amplitude and Frequency
This topic is: How to use the Gearing-Ratio parameter in the Gearing FB to edit the Amplitude and Frequency of motion-values.
Notes:
We use the generic term Crank when the kinematic-element Rocker rotates continuously.
Counter-Clockwise is the positive direction.
This is the most basic application. A crank rotates continuously, and we want it to rotate at a different speed or direction. |
|
We use a Gearing FB to change the angular velocity of a Crank. Connect a Linear Motion FB to a Gearing FB to a Motion-Dimension FB. |
|
|
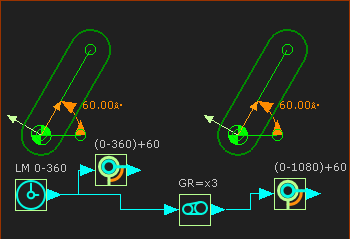
There are two 'Cranks' in the image. The right-crank has a Gearing FB. |
+
+ |
|
|
|
Left Crank: Connect a wire from the output-connector from the Linear-Motion FB to the input-connector of the Motion-Dimension FB. The motion-values from the output of the Linear-Motion FB increases linearly from 0 to 360, and repeats each machine-cycle. Thus, the Crank rotates Counter-Clockwise* at a constant speed, equal to the MMA. * Counter-Clockwise is the positive direction of a rotating-Part. |
|
Right Crank: Connect a wire from the output-connector of the Linear-Motion FB to the input-connector of the Gearing FB. Connect a wire from the output-connector of the Gearing FB to the input-connector of the Motion-Dimension FB. Edit the Gearing Ratio parameter. Gearing Ratio = –1 - the output =360 to 0. The Crank rotates Clockwise each machine-cycle. Gearing Ratio = +3 - the output is now from 0 to 1080. The crank rotates 3× for each machine-cycle. |
|
+
+
|
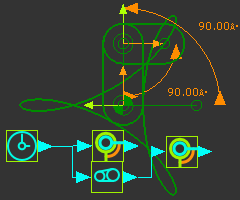
We can add a crank to a crank. |
|
|
The image to the left has an Epicycloid Curve. To add an Epicycloid Curve:
Note: You can easily replicate this motion with a Gear-Pair. (Orbiting / Epicyclic) |
|
You can use a Gearing FB for different reasons. •Connect a wire from a Gearing FB to the input a Motion FB to change the FREQUENCY of the Motion •Connect a wire from a Motion FB to the input a Gearing FB to change the AMPLITUDE of the Motion •Connect a wire from a Gearing FB to the input a Motion FB and to the input of a Gearing FB to change the FREQUENCY and AMPLITUDE of a Motion You can also use a Gearing FB to change the direction of a motion. |
|
AMPLITUDE: |
|
 Change the AMPLITUDE of motion-values |
Connect a Motion FB to the input of the Gearing FB. •Linear-Motion FB: output is 0 - 360º •Motion FB output is 0 - 50 - 0mm •Gearing Ratio = 3× - its output is 0 - 150 - 0mm •Base-Value of Motion-Dimension FB = 20mm The Slider moves from 20 to 170 to 20mm in 1 machine-cycle. The Gearing FB increases the AMPLITUDE of the motion. |
FREQUENCY: |
|
 Change the FREQUENCY of motion-values |
Connect a Gearing FB to the input of the Motion FB. •Linear-Motion FB output is 0 – 360º •Gearing Ratio = 3× - its output is 0 to 1080º •Motion FB output is 0 to 50 to 0mm , but 3× in one machine-cycle. The Slider moves 3× in one machine-cycle. The Slider moves from 20 to 70 to 20mm 3× as the MMA in one machine-cycle. The Gearing FB increases the FREQUENCY of the Sliders motion by 3× |
AMPLITUDE AND FREQUENCY: |
|
 Change the AMPLITUDE and FREQUENCY of motion-values |
To change the amplitude and frequency of a motion, connect a Gearing FB before and after a Motion FB. |
'Expand' then 'Play'
|
