Drag, Double-click, Right-Click
Many mouse actions in MechDesigner are different to those in other CAD software.
Terminology
Term : |
Definition |
|---|---|
Mouse-pointer, cursor, pointer : |
The icon you move about your monitor by moving your mouse. |
Hover : |
To move your Mouse-Pointer above an element in the graphics-area, so that color of the elements changes to the “Selected-Color”. |
Click : |
To press, momentarily, the Left-Mouse-Button, with the standard mouse setting. |
Right-Click : |
To press, momentarily, the Right-Mouse-Button, with the standard mouse setting. |
Double-Click : |
To press, momentarily, the Left-Mouse-Button two times in rapid succession. |
Click-Pause-Click : |
To press, momentarily, the Left-Mouse-Button, two times,, but with a longer period between each click. |
Drag : |
To press the Left-button-Button, move your mouse, and then release your left-Mouse-Button. |
CTRL+Drag : |
To press the CTRL key on your keyboard, and Drag your mouse. |
SHIFT+Drag : |
To press the SHIFT key on your keyboard, and Drag your mouse. |
CTRL+Click : |
To press the CTRL key on your keyboard, and then press the Left-Mouse-Button, momentarily. |
SHIFT+Click : |
To press the SHIFT key on your keyboard, and then press the Left-Mouse-Button, momentarily. |
Drag
Add an element
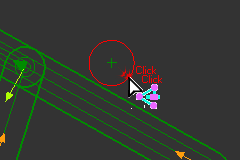
We use drag to add many element-types. For example: •Mechanism-Editor: to add a Part, or to connect a wire between FBs •Part-Editor: to add a Line, CAD-Line, Circle, Arc, or Blend-Curve. |
|
 Drag to add a Circle |
Drag to add an element: 1.Mouse-button down 2.... move your mouse-pointer 3.... mouse-button up. You may (usually not) need to click in the graphics-area to complete the command. |
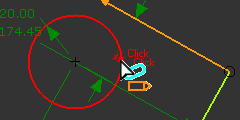
Move an element
We use drag to move elements in the graphics-area. For example: In the: •Mechanism-Editor: to move FBs, Free-Parts or Completely Free Parts, ... •Part-Editor: to move sketch-elements, dimensions, ... |
|
 Drag to move a FB  Drag to move a Dimension |
Drag to move Elements: 1.Hover above an element so that the element is the selected-color. 2.Mouse-button down 3.... move your mouse 4.... mouse-button up. |
CTRL or SHIFT + Drag
 CTRL+Drag = PAN |
CTRL + Drag = PAN 1.Click in the graphics-area to deselect all elements 2.CTRL + Drag to Pan. SHIFT + Drag = SPIN 1.Click in the graphics-area to deselect all elements 2.SHIFT+Drag to rotate at your mouse-pointer's position. See also Keyboard shortcuts for other Spin shortcuts |
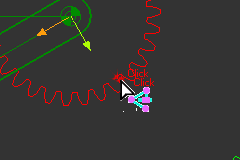
Hover + Drag
 Hover to merge the start-Point of a Line with the end-Point of an Arc |
Part-Editor: to create a sketch-loop or sketch-path. Add sketch-element + Hover above an end-Point + Drag to merge a new sketch-element with the end-Point of an existing sketch-elements Mechanism-Editor: You can add a Part and a Joint at the same time. Add Part + Hover above a Point + Drag to add a Part with a Pin-Joint Add Part + Hover above a Line + Drag to add a Part with a Slide-Joint |
Right-Click
COMMAND-MANAGER
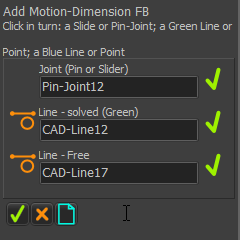 |
When the Command-Manager is active... if there is an element in all selection-boxes... ... Right-Click in the graphics-area = Even faster: As you are about to select the last element: ... Right-Click the last element in the graphics-area = Select the last element +
|
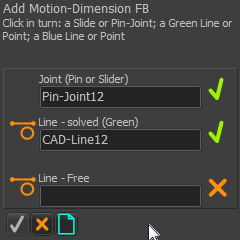 |
If there is not an element in all selection-boxes ... ... Right-Click in the graphics-area = |
MECHANISM-EDITOR
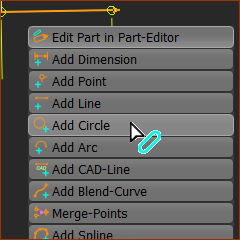
 General shortcut-menu |
Right-click to: 1.Cancel the active command 2.Right-click in the graphics-area The shortcut-menu is next to your mouse-pointer The image does not show all of the shortcut-menu in the Mechanism-Editor. |
 Contextual shortcut-menu |
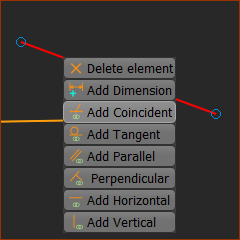
Hover + Right-Click an element
1.Hover above an element until the element is the selected 2.Right-Click The shortcut menu is contextual to the element that you right-click. <<< the shortcut-menu after Hover+Right-Click ... a Part |
PART-EDITOR
 |
In the Part-Editor: 1.Right-click to cancel the active command 2.Right-click again ... ... the shortcut menu is next to your pointer The image is the Part-Editor shortcut menu. Add Circle is about to be selected. Note: Edit Part in Part-Editor is at the top of the shortcut-menu. 1.Click Edit Part in Part-Editor to close the Part-Editor. |
 |
Hover + Right-Click an element 1.Hover above an Element, so that the element is selected. 2.Right-Click The commands that you can do to the element are in the shortcut-menu or 1.Click an Element The element is in the Selection-Window. 2.Right-click the element in the graphics-area |
Double-click
See also: How to Edit an Element. When you double-click an element, you open its dialog. |
|
 |
To edit a Part: 1.Double-Click a Part-Outline The Part-Editor opens. |
 |
or 1.Double-Click a sketch-element that you have added to a Part previously The Part-Editor opens. |
 |
To edit a Dimension in the Part-Editor: 1.If necessary, de-select Add Dimension 2.Double-Click the arrowhead of a Dimension Note: nothing happens if you double-click the dimensional number |
 |
To close the Part-Editor: 1.Double-Click the Y-axis* or a sketch-element (see image) * The Y-axis is a easier to double-click than the X-axis. The X-axis and the CAD-Line are collinear. |
 |
To edit Gear-Pairs or 2D-Cams Best-Practice: Use the Assembly-Tree or the Selection-Window to locate the Gear-Pair or 2D-Cam elements: 1.Click the Gear-Pair or 2D-Cam in the graphics-area or Assembly-Tree 2.Right-click the Gear-Pair or 2D-Cam in the Selection-Window 3.Click Edit element in the shortcut-menu |
 |
In the Assembly-Tree or Selection-Window 1.Double-click an element in the Assembly-Tree or 1.Double-click an element in the Selection-Window If it is possible to edit the element, the element's dialog opens. |
To stop 'Tool-Tips' showing next to your pointer:
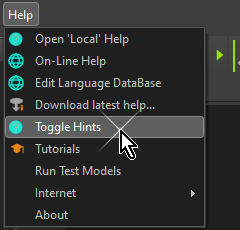 |
Tool-tips, or Hints, can hide the tool and icon that you want to use. To show or hide Tool-Tips next to your pointer: 1.Click Help menu >Toggle Hints or 1.Click Application Settings > Accessibility tab > Show Hints check-box |