 MotionDesigner
Use MotionDesigner to add and design motions for and . Each motion you add has a Motion name-tab.
See MotionDesigner Reference & User Interface to learn how to use MotionDesigner.
When you start MechDesigner, MotionDesigner is docked to the right side of the application window.
You must add and use a to link a motion that you have designer in MotionDesigner to a Motion-Part or Motion-Point that is in your MechDesigner model.
To Link a Motion to a Motion-Part
STEP 1: Add a Motion FB to the graphics-area
1.Click MechDesigner >
2.Click in the graphics-area |
The is now in the graphics-area and Assembly-Tree.
STEP 2: Open the Motion FB dialog
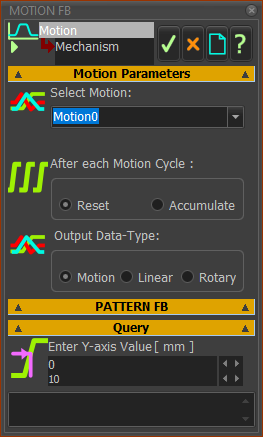
The dialog is now open.
STEP 3:Edit the Parameters |
|
Select a Motion from the list of Motion names in the Select Motion drop-down list box.
|
Now, the Motion name has a link with the Motion FB.
•Reset output : Default (use in most cases)
•Accumulate output : Select when the motion is a progressive motion - for example, the motion is indexing.
See more details : Motion FB dialog
|
•Motion : Default (use in most cases)
•Linear or Rotary : Select if you connect the Motion FB to a Motion-Path FB or a Math FB. |
Not normally used.
Enter a Y-axis value to find the X-axis value(s) for the motion in the Select Motion box.
|
|
STEP 4:Click  to close the Motion FB dialog to close the Motion FB dialog
STEP 5: Connect wires to the input-connector and from the output-connector of the Motion FB
1.Connect a wire to the input-connector of the Motion FB
Usually, (but not always), connect a wire from the output of a Linear-Motion FB or a Gearing FB to the input-connector of the Motion FB.
When you cycle the model, motion-data at the input-connector controls the X-axis value for the Motion in the Select Motion box, above.
2.Connect a wire from the output-connector of the Motion FB
Usually (not always), connect a wire from the Motion FB to the input of a Motion-Dimension FB or a Motion-Path FB.
When you cycle the model, the motion-data at the output-connector is the Y-axis value of the Motion in the Select Motion box that agrees with the X-axis value at its input-connector.
|
|