Straight-Line Mechanisms
History
It is not possible to draw a straight-line with simple tools.
Historically, it was difficult to manufacture linear guide-ways that had low friction. Also, after it was manufactured, it was impossible to measure its straightness.
However, it is relatively easy to make Parts of the same length. It is also relatively easy to measure their relative length.
Engineers, mathematicians and inventors searched for mechanism designs with Pin-Joints that could guide a Point, or Part, along a straight-line.
Engineers found mechanisms by trial and error, while mathematicians searched for mechanisms from analytical geometry.
Straight-Line Mechanisms are classified as:
•Approximate Straight-Line Mechanisms
•Exact Straight-Line Mechanisms
Approximate Straight Line Mechanism
The Watt Straight-Line Mechanism was invented by James Watt in about 1773. The historical contextual: A steam engine condenses steam, or applies steam pressure, to the two sides of a working piston. It can 'huff' and 'puff' in the two directions. However, before the Watt Straight Line Mechanism, piston steam engines would do 'work' efficiently only in one direction. This was because the piston rod had to pass through a gland. The gland had to seal the working steam volume from the atmosphere. If the rod moved sideways, the gland would usually leak. To make a seal that was efficient and leak-free, it be an advantage to guide the piston rod in a straight line through the gland. The Watt Straight-Line Mechanism was one of the first kinematic-chains used in this context. Watt also used a pantograph mechanism to increase the length of the straight line. He called the pantograph the Parallel Motion. See YouTube Video: http://youtu.be/7LpHf0ssIb8 . |
|||
The video is of a Watt Straight-Line kinematic-chain. Input: is a Rocker – it rotates by 30º with a Rise-Dwell-Return-Dwell motion. Output: is a Point on the coupler Part that moves vertically in a straight line - approximately.
|
|||
|
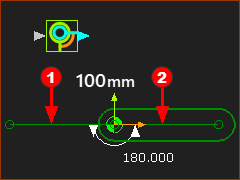
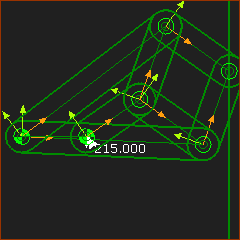
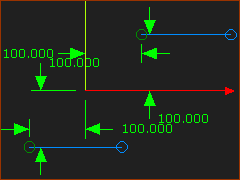
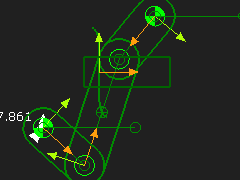
To assemble the Watt's Straight-Line Mechanism STEP 1: Add two Lines to the Base-Part 1.Edit the Base-Part 2.Part-Editor: Add two horizontal Lines. Lines have Points. We need the Points for Pin-Joints. The horizontal distance between the Points is 200mm. Each Part that is joined to the Base-Part will be 100mm long. The vertical distance is 200mm. The coupler will be 200mm long. STEP 2: Add the Motion-Part - a Rocker 1.Edit the Base-Part : 2.Part-Editor: Geometry toolbar > Add Line : Drag to add the Line , Add Horizontal Constraints, Add Dimensions, Close the Part-Editor: 3.Mechanism-Editor: Click Kinematic elements- > Add Part : drag to add the new Part. 4.Mechanism-Editor: Click Kinematic elements- > Add Pin-Joint: Click the start-Point of the new Part and the start-Point of the Line in the Base-Part. 5.Mechanism-Editor: Click Kinematic FB toolbar > Add Motion-Dimension FB: Click the Pin-Joint the Line in Base-Part; the CAD-Line in Part. and 6.Edit the Motion-Dimension FB - Enter Base-Value =0 7.Mechanism-Editor: Click Kinematic FB toolbar > Add Motion FB: and also a Add Linear-Motion FB 8.Joint the FBs with wires . You have a Crank STEP 3: Add an R-R-R dyad (Remember - Dyads have 2 Parts and 3 Joints) 1.Mechanism-Editor: Add Part × 2 Edit each Part: 2.Part-Editor: Edit the length dimension one Part to 200mm long, the other Part to 100mm. Exit the Part-Editor, each time. 3.Mechanism-Editor: Add three Pin-Joints. Click the start-Point and end-Points as needed. <<< the image is the kinematic-chain. |
||
|
|||
|
|||
|
STEP 4: Add a Point to the coupler Part. 1.Edit the Coupler (long Part) 2.Part-Editor: Add a Circle or Point 3.Part-Editor : Add a Mid-Point constraint between the CAD-Line and the center-Point of the Circle (or the Point) 4.Exit the Part-Editor |
||
|
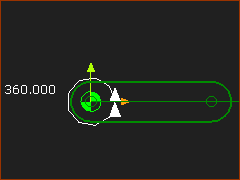
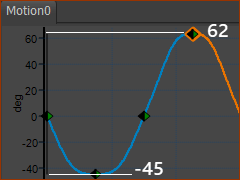
STEP 5: Edit the Motion The range of the motion should not 'break the kinematic-chain 1.Edit the four segments of the Motion: Segment 1 : 0º to 45º Segment 2 : 45º to 0º Segment 1 : 0º to 62º Segment 1 : 62º to 0º |
||
|
STEP 6: Add a Trace-Point to show Straight Line 1.Mechanism-Editor: Click Kinematic-elements toolbar > Add Trace-Point 2.Mechanism-Editor: Click center-Point of the Circle 3.Click The Trace-Point is straight in the middle of the motion, but it bends away at the extreme top and bottom. |
||


Exact Straight Line Mechanism
The Peaucellier Cell kinematic-chain is the father of Exact Straight-Line Mechanisms. A point moves with an exact straight line for a range of movement. |
||
The video is of the Peaucellier Cell Straight-Line kinematic-chain. •Input a Rocker – it oscillates 140º. •Output a Point that moves vertically.
STEP 1: Add the Input Part – a Rocker. See Scotch-Yoke, Whitworth and Oldham mechanical devices. The length of the Rocker In my model, the Rocker and the distance between the Points =100mm. |
||
|
||
|
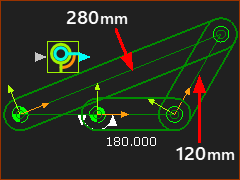
STEP 2: Add the first R-R-R dyad. (Dyads ALWAYS have two Parts and three Joints) This dyad is easy for you. If not, review Tutorial 2. Add two Parts – one approximately 280mm long, the other approximately 120mm long. Edit the lengths if required. Add three Pin-Joints to assemble a standard four-bar kinematic-chain as shown to the left. |
|
|
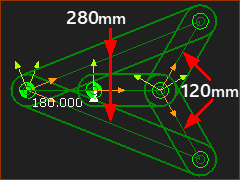
STEP 3: Add the second dyad. •Add two Parts •Add three Pin-Joints. The Select Elements dialog opens. The Point you select first is at the top of the list of Points in the dialog. In the Select Elements dialog: CTRL + Select the Points from two different Parts Edit the lengths of the two new Parts to be the same as the equivalent Parts of the first dyad. |
|
|
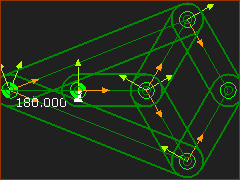
STEP 4: Add the third dyad. •Add two Parts •Add three Pin-Joints As above, you add a Pin-Joint over the top of Pin-Joint. The diamond has four equal lengths. |
|
|
STEP 5: Add the Function-Blocks •Add a Linear-Motion FB •Add a Motion FB •Connect the Function-Blocks together •Cycle the Mechanism STEP 6: Add a Trace-Point •Mechanism menu > Add Trace-Point Click the Point in the Pin-Joint as you can see in the image to the left. You can see that it traces an exact straight line. |
|