Motion
Motion is an abstract concept. You cannot buy a motion off eBay, for example.
Motion design software is only useful if the motion is visible. The easiest method is to plot a motion as a graph - that is, MotionDesigner.
A different method is to move machine-elements in a model with the same motions as the motion graphs - that is, MechDesigner.
Motion Graphs in MotionDesigner
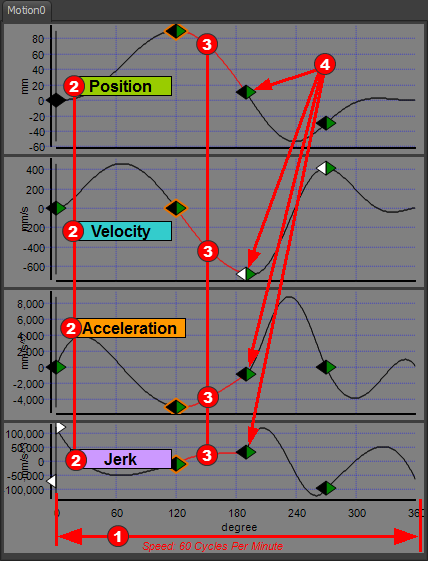
You can see up to four graphs in MotionDesigner: Position, Velocity, Acceleration, and Jerk - the four important motion-derivatives. Use the View toolbar > P, V, A, & J icons to show or hide a graph of each motion-derivative. You must show a minimum of one graph. |
|
You should understand:
The X-axis units and Motion-Width of each Motion can be different. Typically, the X-axis units are degrees and the Motion-Width is 360 degrees - equal to the Master Machine Angle in MechDesigner. Other units for the X-axis are: radians, cycles*, seconds, milliseconds - see Edit toolbar > Active Motion Settings / Configure Motion * We use Machine Settings > Cycles/Minute to control the time period of one cycle.
We show for you the motion-derivative of the same motion above each other. If you edit a motion-value in one of the motion-derivatives, you automatically change the shape of the other motion-derivatives.
It is easier to design a motion when you split it into segments. However, too many segments are difficult to manage. Each segment has a Motion-Law, which is defined by a mathematical function. You can change the Motion-Law of each segment with the Motion-Law Selector - a drop-down box below the graph-area..
Blend-Points join the segments end-to-end. Blend-Points are also called Nodes. Names we use in this help for Segments: •Selected-Segment - the segment that you click, it has a different color •Previous-Segment - one segment before (to the left) the Selected-Segment •Next-Segment - one segment after (to the right) of the Selected-Segment •First-segment - the segment at the start of the motion - see also Blend-Point Editor > X-axis value > Motion-Start •Last-Segment - the segment at the end of the motion Notes: The end of the Last-Segment is at the start of the First-Segment. When you click a segment, it becomes the Selected-Segment. |