Mechanism and Mechanism-Editor?
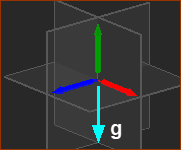
Important - Machine Layout and the Gravitational Vector ( g = 9.81665 m/s/s )
|
Gravity Vector - its direction is in the “global” negative Y-axis direction. You cannot edit the direction or the magnitude of the Gravity Vector. Therefore, add the first Mechanism-Editor to a Plane that represents the general layout of your machine. For example, if your machine is a horizontal, rotating table, you should add the first Mechanism-Editor for the table to the Top Plane, or a Plane that is parallel to the Top Plane. |
Add Mechanism
STEP 1:Start the Add Mechanism command:
 Model elements toolbar |
|
STEP 2: Select a Plane
 Command-Manager  Command-Manager - Plane element |
The Command-Manager (left of graphics-area) has one selection-box. You must select a Plane.
The Plane is now in the selection-box in the Command-Manager. To see Planes: Enable Show Solids in Mechanisms. Enable: Visibility menu > Display Planes. |
STEP 3: Complete the command
 Command-Manager - 'OK' |
You must click the 'tick' to complete the command.
|
Results
1.The Command-Manager closes. 2.You jump immediately to a new Mechanism-Editor workspace - with a Mechanism tab, graphics-area, Base-Part, and toolbars. 3.There is a new Mechanism element in the Assembly-Tree. The Mechanism element is a child to the Plane you select. See also: The Base-Part does not show correctly! |
RESULT: Workspace
 Mechanism-Editor workspace
|
|
The new Mechanism-Editor:
|
Result: Assembly-Tree
 Hieratchy of new Mechanism in Assembly-Tree |
|
The hierarchy of the new Mechanism element
|