Add menu
The Add menu and its sub-menus have the commands you need to build your models. The commands are contextual to each editor-type: Model-Editor, Mechanism-Editor, Part-Editor.
To build a model, you do these steps:
STEP 1: Add an element that is contextual to the editor-type: See Model-Editor See Mechanism-Editor See Part-Editor STEP 2: Open the element's dialog See Dialogs STEP 3: Edit the parameters to change the element's properties Use the element's dialog to edit its parameters: See How to edit a Parameter in a dialog STEP 4: Close the dialog STEP 5: Do STEPS 1 to 4 again, and again, ... |
Add menu
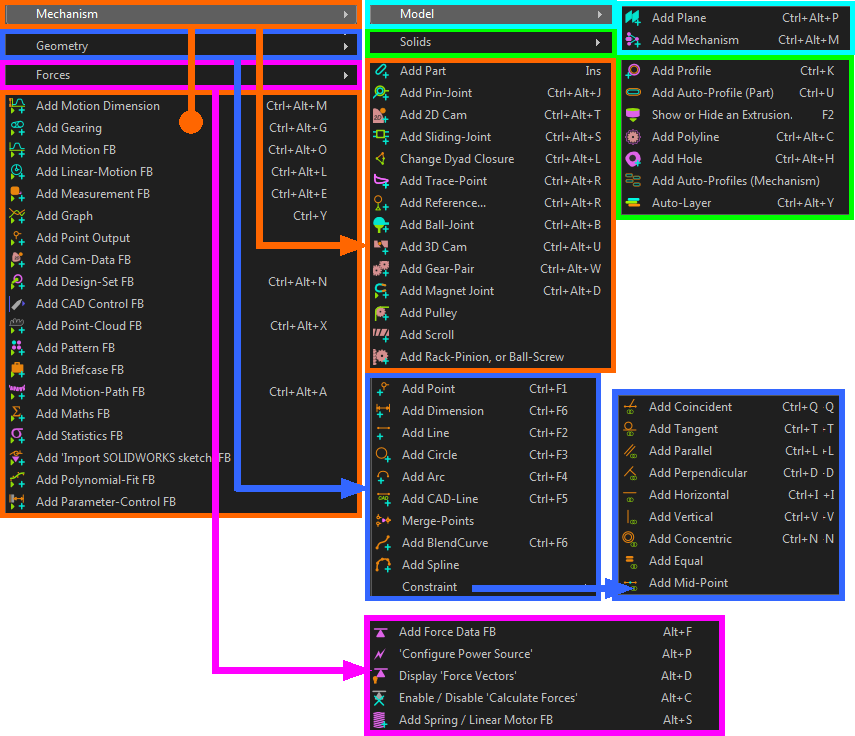
This is the structure of the Add menu.

Structure of the Add menu
Model Editor menus and toolbar:
Model elements toolbar - left of the graphic-area (only two commands: add Planes and Mechanism-Editors to Planes ) |
Mechanism-Editor menus and toolbars:
Model elements toolbar - left of the graphic-area - add Planes and Mechanism-Editors to Planes Kinematic elements toolbar - left of the graphic-area - add basic elements: parts, joints, to build kinematic-chains Machine elements toolbar - left of the graphic-area - add more complex, functional elements to the model Kinematic Function-Blocks toolbar - right of the graphic-area - plan and measure the motion of each kinematic-chain Modeling Function-Blocks toolbar - above the graphic-area - tools that help you do more complex modeling Force elements toolbar - right of the graphic-area - measure force, torque, and power that is required to drive each kinematic-chain Solid element toolbar - above the graphic-area - show kinematic elements as solid model elements |
Part-Editor menus and toolbars:
Geometry toolbar - left of the graphic-area - add sketch-elements and dimensions to Parts Constraints toolbar - right of the graphic-area - add constraints to sketch-elements |